Welcome!

Welcome to the Designs by Ryn blog! The monthly Customer Creation Challenge can be found above in the navigation menu as well as links to my Shop, Facebook Page and Pinterest. Along the right you will find my Design Team. I hope you enjoy your visit and leave with some inspiration.

Monday, May 09, 2016

Guest Spotlight with BozenA

Hey everyone, 

I have another card from BozenA today using my Water Effects stamps. I hope you enjoy :)

Some time ago I prepared few sheets of backgrounds using my Brushos. They produced several nice results and a few less cool panels. For this card I used one of the less cool panels. I was surprised that it turned out so well. No background is important without the other elements.

To begin embellishing the background I reached out for my unique stamps from Ryn. I used Hanging Droplet Set, Trickling Water 2 and  Trickling Water Set 2. I also used a stencil (STAMPlorations Flutterby Stencil) with Inka Gold colors: Gold and Steelblue. I had a great time blending! That's how the subtle pattern of a butterfly came about. It looks his shadow, kind of a spirit... To give him a little personality I glued moving mini eyes. At the end I darkened the edges with Distress inks: sapphire and black.

This card was created spur of the moment so I do not have photographs of it's creation process. I hope the above guidelines will suffice.
In this photo you can see that I used black pen to extend the effect of the Trickling Water designs (the dotted area in the original is shorter). I also added the highlights of each drop with a white Gelly Roll.
Hope you enjoyed my card!
BozenA
https://artcardbox.blogspot.com

Friday, April 08, 2016

A Spring card from Bożena

Hello Everyone, 

Bożena here Guest Designing for Ryn.

This card already went to our friend. Michael is fascinated by nature, especially that which is rare for Europeans. So I thought that hummingbird is the perfect theme for him. There is no more beautiful designs of hummingbirds than those created by Ryn Tanaka. I recently received from a gift stencil Maidenhair Fern  (Ryn, thank you very much, it is great) that I used with the stamp Flying Hummingbird 3 and Hibiscus from Ryn.
First I added Maidenhair Fern stencil on white cardboard using inks DI Mowed Lawn and Twisted Citron
So I could color the background around the leaves, I covered them with a layer of colorless powder embossing
Then I colored the background with inks TO Salty Ocean, Tumbled Glass, Squeezed Lemonade, Spiced Marmalade and Mustard Seed. It turned out that the powder embossing has covered an area a little larger than the fern stencil. It looks as if the edges were painted white.
The next step was to prepare a Hibiscus flower. I stamped it with clear embossing powder, added bloomed ink (DI ripe persimmon), and then I cut out flower with scissors.
I did the same thing when preparing a hummingbird, but this time I use black powder embossing
Then I painted it with Promarkers
Hummingbird got a little sparkle of Inka Gold, and the flower got a touch of Liquid Pearl
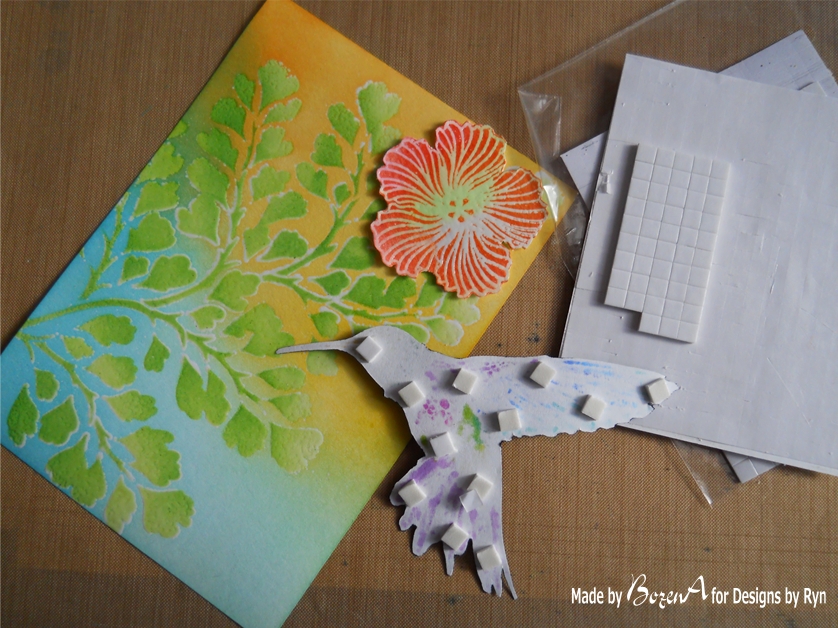
The Hibiscus and Hummingbird were then stuck on with adhesive foam to give them a 3D look.
At the end I added a drop of honey-colored glass falling from the beak of the hummingbird
I hope you like my card. If so, I will be grateful if you leave me a comment. Thank you for your time.
BożenA (http://artcardbox.blogspot.com)

Friday, April 01, 2016

Last month's Customer Creation Challenge Winner is...

Hey everyone,

The random winner for last month's Customer Creation Challenge is... Anne from Anne's Papercreations!!! She's made an awesome tutorial HERE showcasing what she made and how she did it. She's included lots of pics showing her process.

Anne's cards below using my Sea Creature and Water Effects stamp designs... You can find them HERE on my website.

Many thanks for popping by! I've posted the April challenge on my blog HERE. Best of luck! I look forward to seeing what comes in this month :)

All my best,

Ryn


April Customer Creation Challenge


Monday, March 21, 2016

Guest Spot with Ellie Knol!


 Guest designing again for Designs By Ryn..I am happy! 
I´ve used a tiny part of a masterboard (I´ve done a tutorial on this here) as the base, and used those similar colors to color Spiral Shell and the Rising Bubbles. I used watercolor pencils to do so. 


Wednesday, March 02, 2016

February Customer Creation Challenge Winner...

Hey everyone!

Just a quick one from me today. I've posted the March Customer Creation Challenge on my blog HERE. Many thanks to everyone for participating last month :)

The random winner for February is... Samantha Wade! Please get in touch with me at designsbyryn@gmail.com for your free cling-mounted stamp or stencil.

Below is Samantha's make using Water Droplets... HERE is Samantha's blog post.

Thanks for stopping by!

Ryn


March Customer Creation Challenge


Friday, February 26, 2016

Delicate by Ellie

Hey Everyone, 

A Guest Spot for Ellie Knol today using my Hibiscus and Flower Lace designs. I hope you enjoy! HERE is a link to Ellie's blog if you would like to pop by for a visit. And now in Ellie's words...

 I enjoyed using these stamps so much!! 
Another guest design post from me for Designs By Ryn ; 
I LOVE playing with these gorgeous stamps !!
This is a background from my stash again; it's Colorwash sprayed onto it.

I stamped the Hibiscus onto a seperate piece of paper, fussy cut it and colored it.
For the background I stamped the Flower Lace stamp, and gave it some highlighting with a white acrylic marker and a brown fineliner, and some color with a watercolor pencil
I also stamped the flower onto the background, to add a layer, and interest of course.
I adhered the flower to the card with some 3D tape.
I added a rub-on script on the right-hand side of the card - you know me, I must add some script!
The green 'frame ' is also a rub-on.
The 'groetjes' (|Inkerbell) text finishes it off.
Ellie

Friday, February 19, 2016

Bożena's Sea Scene

Hello everyone!

Ryn here. I have another Guest Spot for Bożena today. She'll take you through her creative process using some of my Sea Creature stamps. The Polish version of this tutorial can be found on Bożena's blog HERE. Hope you enjoy!

And now in Bożena's words...  

I have recently received a package with the new stamps from Designs By Ryn and I just had to create something with them. I picked 3 stamps from the set Sea Creatures 1 – Kelp, Coral Set and School of Fish Set.
I stamped the image of Kelp on watercolour paper using Archival Inks in 3 colours – Sap Greek, Watering Can and Cobalt.
I applied the ink pads on the stamp randomly to create the shadowing effect on the leaves. I stamped the image twice, to make the pattern longer. Then I stamped the coral using Watering Can ink and School of Fish Set using black ink, adding them to the bottom of my panel. After that I added some more colour to the Kelp and to the Coral. I used Kuretake Gansai Tambi 24 colour set of watercolours. The numbers I used were 51, 58, 55 for the Kelp and 31, 43 for the Coral.
The next step was to add the background. For that I used the Sea Bubbles stamp set. I stamped it in various colours of Distress Inks: Peacock Feathers, Twisted Citron, Pine Needles and Salty Ocean. I used next generation stamping. Using a scrap piece of cardstock to stamp off my ink I then stamped the image onto my panel.
I used the same colours of DI to create my water world background. Among the Kelp leaves I added an air bubblearound the stamped fish. At first I coloured the bubble using multiple colours to make it look like a soap bubble, but later changed my mind.
I then added some shine to the fish. For this I used Inka Gold in  – Steel blue, Emerald  and Jade green. I also brightened the Coral adding white gel pen highlights.
Here you can see the colourful shine on the fish.
I did not stamp the Kelp using black Ink, so I used Fine Line Drawing Pen 0,1 by Letraset to make the outline sharper.
  I decided the seaweeds lacked colour
  and also in certain places they need brightening (here I used white Gelly Roll)
After making those changes, I used some watercolour pencils to add shading.
I then decided, that the bubble with the fish was too soapy and had no chance of surviving in the sea water. My decision was to use some DI Pumice Stone and sponge it on the edges, masking off the bubble.
This is how the final version of the bubble turned out. To finish up I also darkened the outside of the bubble to make it come forward a little more and I used some white Gelly Roll for the highlights.
I then used some Memento dye inks in Bahama Blue and Paris Dusk to darken the border around my panel. The bright center and darkened edges make the main piece pop more. 
At first I used some Inka Gold in Emerald, Steel blue and Turquise, but I was not entirely sattisfied  with the result. That is why I then used Memento Ink to minimalize the metallic effect. You can see the changes here:

I love my new stamps from Designs By Ryn! I already cannot wait to start working on another card. I have so many ideas and visions in my head, some perhaps hard to put on paper, but how inspiring!
I hope I managed to inspire you in some way and I hope we will see each other again soon. Whenever you are ready for some more inspiration! 
Thank you for your patience and your time, I am very glad you visited and I hope to see you again soon.
Have a nice day,
BożenA